How to Create a Custom HTML signature in Gmail
Written on August 4, 2016
You can use the same basic technique for Canned Responses as well.
Gmail is annoying in it’s limitations on what code can be included in your signature. It turns out that with this little hack you can add most html to your signature. I didn’t invent this, my co-worker told me how to do this for Canned Responses. He in turn had heard the technique from someone else… I did discover how you can apply the technique to signatures which takes one little modification.
There are a few style rules that will get stripped out, but I’ve found I can do most of what I want.
1. Create the signature in html
Let’s say you want your signature to be:
Right? Ok, just go with it. Write up the html in your favorite text editor. All of your styles will need to be inlined. Copy the html:
<div style="overflow:auto;padding:5px;">
<div style="font-family:helvetica,arial;border-radius:400px;background-color:hsl(60,100%,85%);text-align:center;float:left;padding:0;height:200px;line-height: 200px;width:200px;">
 <span style="color:hsl(0,90%,50%);font-size:30px;">J</span><span style="color:hsl(15,90%,50%);font-size:35px;">a</span><span style="color:hsl(30,90%,50%);font-size:24px;">k</span><span style="color:hsl(45,90%,50%);font-size:26px;">e</span>
 <span style="color:hsl(60,90%,45%);font-size:18px;">P</span><span style="color:hsl(70,90%,45%);font-size:25px;">a</span><span style="color:hsl(85,90%,47%);font-size:30px;">r</span><span style="color:hsl(100,90%,50%);font-size:27px;">i</span><span style="color:hsl(115,90%,50%);font-size:38px;">s</span>
</div>
</div>
2. Add the signature to Gmail
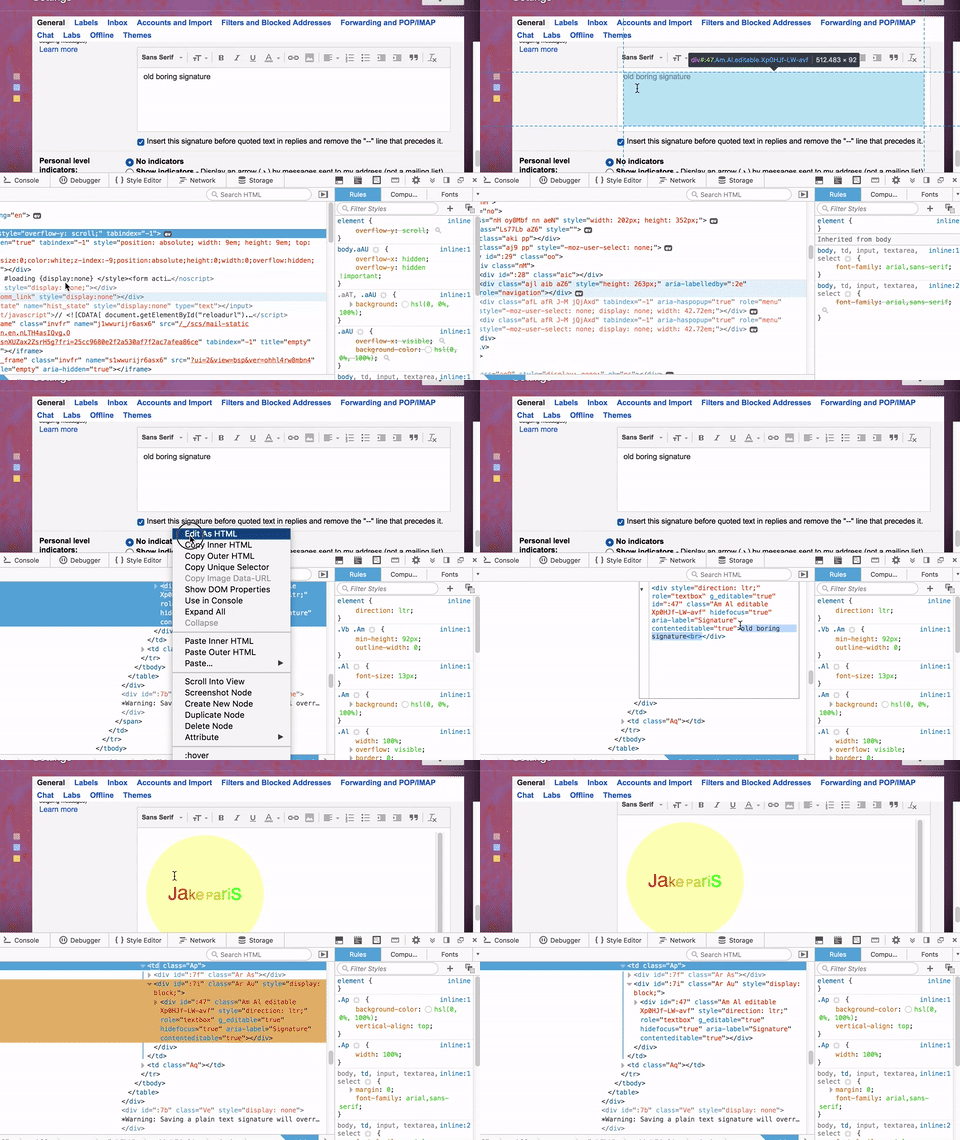
In gmail, open your general settings page (from the inbox, click the gear icon, then “settings”, then the “general” tab) and scroll to the rich text editor. Open your developer tools (option+cmd+i or option+ctrl+i) and use the element selector to select the rich text editor.
You should see something like this around the selected element:
<div style="direction: ltr;" role="textbox" g_editable="true" id=":6t" class="Am Al editable" aria-label="Signature" contenteditable="true">
<br></div>
Just look for the contenteditable=”true” and you’ll know you have the correct element. In your Dom Inspector right click that element and select Edit as HTML. This is where you’ll want to paste in the html for your signature, but be careful to paste it insde the outer div (the one with the contenteditable=”true” attribute. Don’t overwrite that element.
Click anywhere outside the editing area to finish editing and there’s your custom signature!

3. Make gmail recognize It
If you’re using this technique for a signature (as opposed to a Canned Response), you’ll need to take an extra step to get the signature to actually save. Gmail is only going to recognize that the signature setting needs to be saved if it detects that a change was made to it. It will not detect this just from pasting in the html. You have to actually do something. Note: you have to do it in this order, as gmail doesn’t seem to recognize your pasted html if you first make an edit, then paste in your code.
Click in the signature area (not the developer tools, but the regular spot you’d edit your signature). Make some kind of minor edit (like add a space, then delete it) which alerts gmail that the signature needs to be saved.
Remember to click “Save Changes” at the bottom, and your beautiful new signature will be ready to use.
Keep it Clean
Remember that gmail does have restrictions on what style rules it allows, so don’t be surprised if your cool transform: rotate(5deg); doesn’t actually save.